Everything can be done with budget
Transform Your Space: 16 DIY Wall Texture Ideas on a Budget
I was genuinely confused when I first noticed the Wall Texture in my house, because every single wall looks exactly the same. I kept wondering if the previous owner really sprayed texture over every inch of a 3,900-square-foot home, or if there was some other trick behind it. As someone who isn’t very handy, I just wanted to understand what I was dealing with before attempting a patch. Once I looked closer, it became clear this Wall Texture wasn’t random at all but a standard sprayed finish meant to hide imperfections and speed up drywall work.
From what I learned, this type of Wall Texture is usually made from drywall compound sprayed on with a hopper gun and then lightly knocked down once it starts to set. That explains why it looks consistent everywhere and why patching it feels intimidating. For small repairs, I realized the goal isn’t perfection but blending. Practicing first on cardboard or scrap drywall helps a lot, because matching Wall Texture takes trial and error, especially if you’ve never done it before.
What helped me relax is understanding that even pros admit this kind of Wall Texture is hard to match on the first try. The key is feathering the texture beyond the patch so it disappears into the wall instead of stopping sharply. It reminded me of organizing Laundry Room Storage, where functionality matters more than obsessing over tiny details. Once I accepted that the texture exists to hide flaws, patching felt less scary and a lot more doable.
Why You Need to Choose these DIY Wall Texture Ideas
Adding texture to your walls instantly transforms a plain room into a space full of character and depth. Wall textures create visual interest, making a room feel warmer, cozier, and more inviting, while also helping to hide minor imperfections that flat paint cannot conceal. Choosing the right texture can reflect your personal style, from modern minimalism to rustic charm, and allows you to experiment with light and shadow for a dynamic, ever-changing atmosphere.
Some Helpful Tips to Consider
Before diving into wall textures, think about the size of your room and the mood you want to create. Lighter textures and subtle patterns can open up smaller spaces, while bold textures make larger rooms feel more grounded and stylish. Consider the type of material you prefer—plaster, stucco, or wallpaper textures—and how much maintenance it may require. Test samples on a small section of your wall to ensure the color and texture complement your existing décor before committing to the full project.
16. Bubble Wrap Stamping
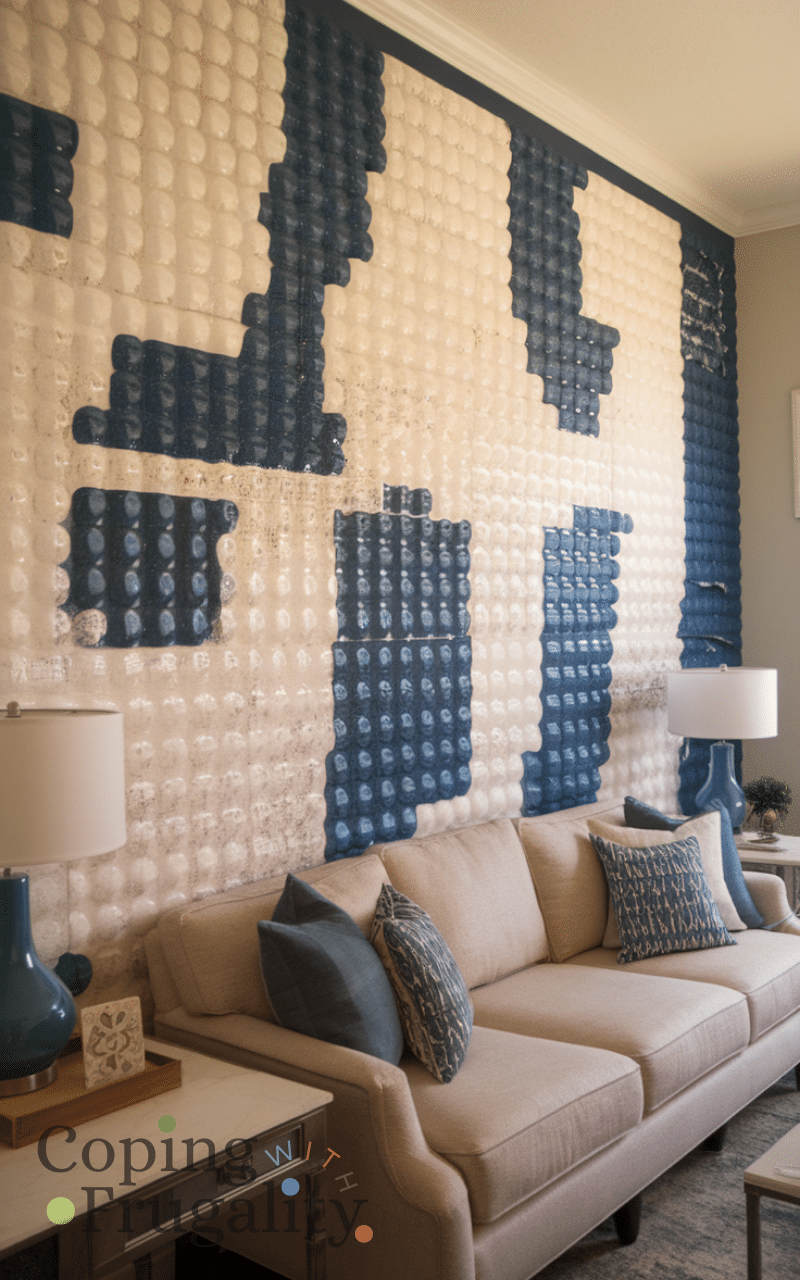
Using bubble wrap is a fun and creative way to add texture to your walls without spending a dime. Simply apply a thin layer of paint to the bubble wrap and press it onto the wall in patterns you like. This DIY wall texture idea on a budget gives a playful, dimensional effect and can be customized with different colors. It’s perfect for adding a whimsical touch to kids’ rooms or even a lively accent wall. No need for professional tools—just some leftover paint and bubble wrap from packaging.
I’ve done this one in a small hallway, and it cost me about $15–$40 total since I only needed a quart of paint and used packaging I already had. My biggest money-saving tip is to check your recycling bin before buying anything—bubble wrap shows up more often than you think. I strongly recommend practicing your pressure on poster board first because pressing too hard makes it look blotchy fast. The most common mistake I see is overloading the wrap with paint, which turns the pattern into a smeared mess. Keep it light, layer slowly, and trust the imperfect look—it’s supposed to feel playful.
15. Newspaper Collage
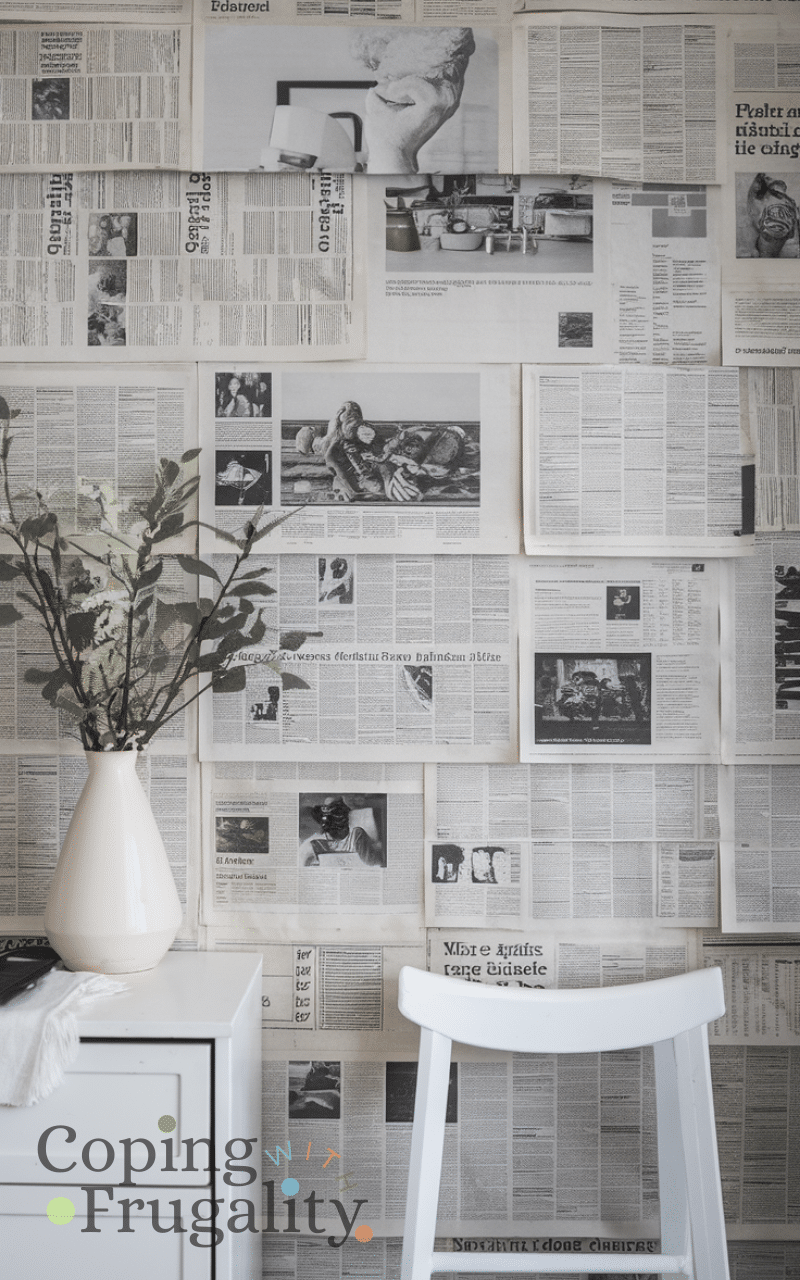
Old newspapers can be transformed into a chic, textured wall covering. By layering crumpled or folded newspaper sheets and sealing them with a DIY paste or watered-down glue, you can create a unique, vintage-inspired wall texture. This DIY wall texture idea on a budget is ideal for accent walls or creative spaces, adding visual interest without breaking the bank. You can even leave the text exposed for an artsy vibe or paint over it for subtle depth. It’s sustainable, fun, and a great way to recycle while decorating.
I love how dramatic this looks for around $20–$60, especially if you already have old newspapers lying around. Instead of buying fancy adhesive, I mix school glue with water and it works beautifully for a fraction of the cost. Personally, I recommend sealing everything with a matte topcoat so it doesn’t yellow unevenly over time. One mistake people make is skipping the smoothing step—air bubbles will haunt you later. Take your time pressing each sheet flat; patience is what makes this look intentional instead of chaotic.
14. Rope Art Panels
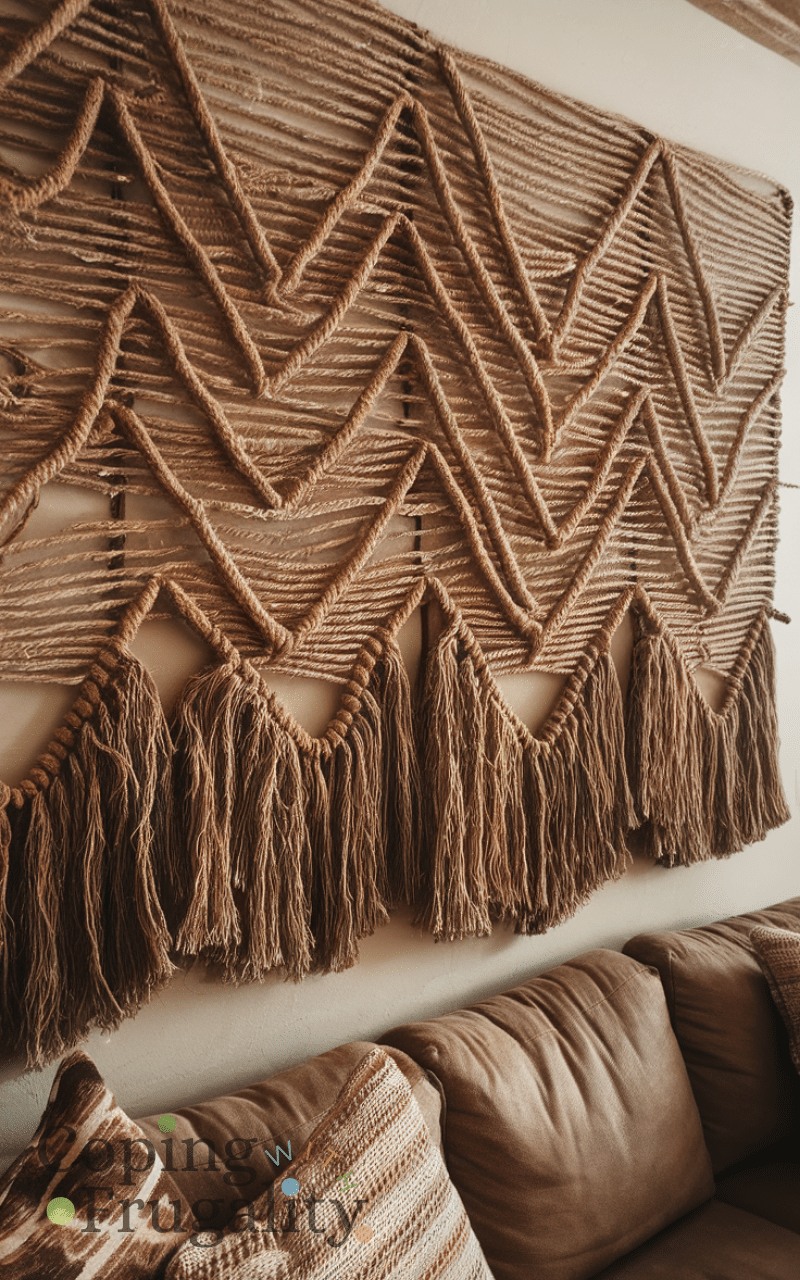
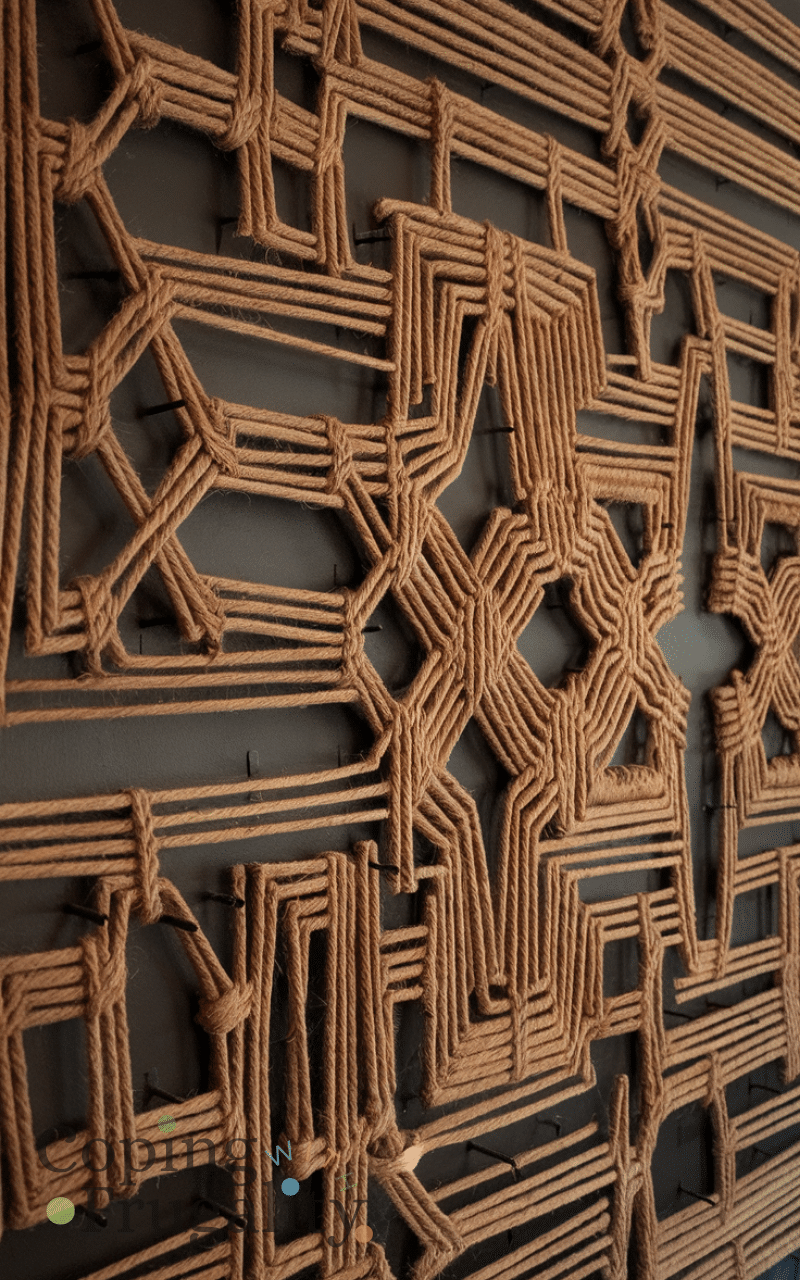
Repurpose leftover ropes or twine to make stunning textured wall panels. Arrange the ropes in patterns—zigzags, waves, or geometric shapes—and attach them to a wall with nails or adhesive strips. This DIY wall texture idea on a budget gives a rustic and tactile feel to any room. It works wonderfully above a bed, sofa, or hallway. Plus, you can experiment with dyed ropes or natural tones for a boho-chic touch. Rope art is simple, inexpensive, and transforms bland walls into eye-catching décor.
I’ve created rope panels above a bed for roughly $40–$120 depending on the rope quality. My money-saving tip is to buy natural jute rope from hardware stores instead of craft stores—it’s dramatically cheaper per foot. I honestly prefer sticking to one tone because too many colors can start to look cluttered. A common mistake is not mapping out your pattern first, which leads to uneven spacing. Lay everything out on the floor before attaching it—trust me, it saves frustration.
13. Cardboard Relief Art
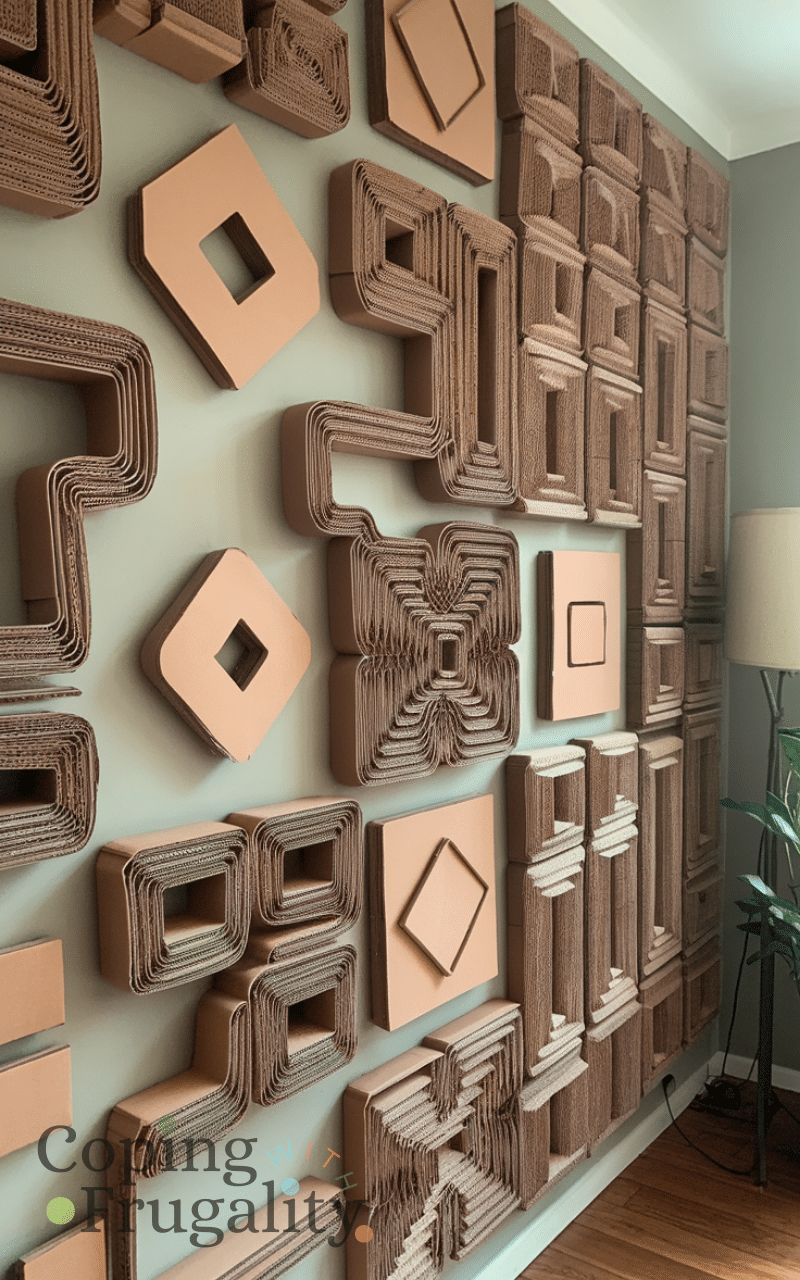
Take old cardboard boxes and cut them into strips, shapes, or patterns to stick on the wall. Layering pieces creates a 3D effect that’s both modern and playful. This DIY wall texture idea on a budget turns waste materials into unique décor and can be painted or left natural for contrast. It’s easy to customize in size, color, and design, making it perfect for apartments or rental spaces. Cardboard relief is lightweight and gives a creative, personalized touch to your home without any extra cost.
This is one of my favorite near-free projects—usually $10–$35 if you already have paint. I always recommend priming cardboard first so it doesn’t warp or soak up paint unevenly. The biggest budget tip here is to reuse shipping boxes instead of buying craft boards. In my opinion, geometric designs look more elevated than random shapes. The mistake I see most is gluing pieces without considering wall anchors—adhesive alone won’t always hold layered weight.
12. Fabric Wall Panels
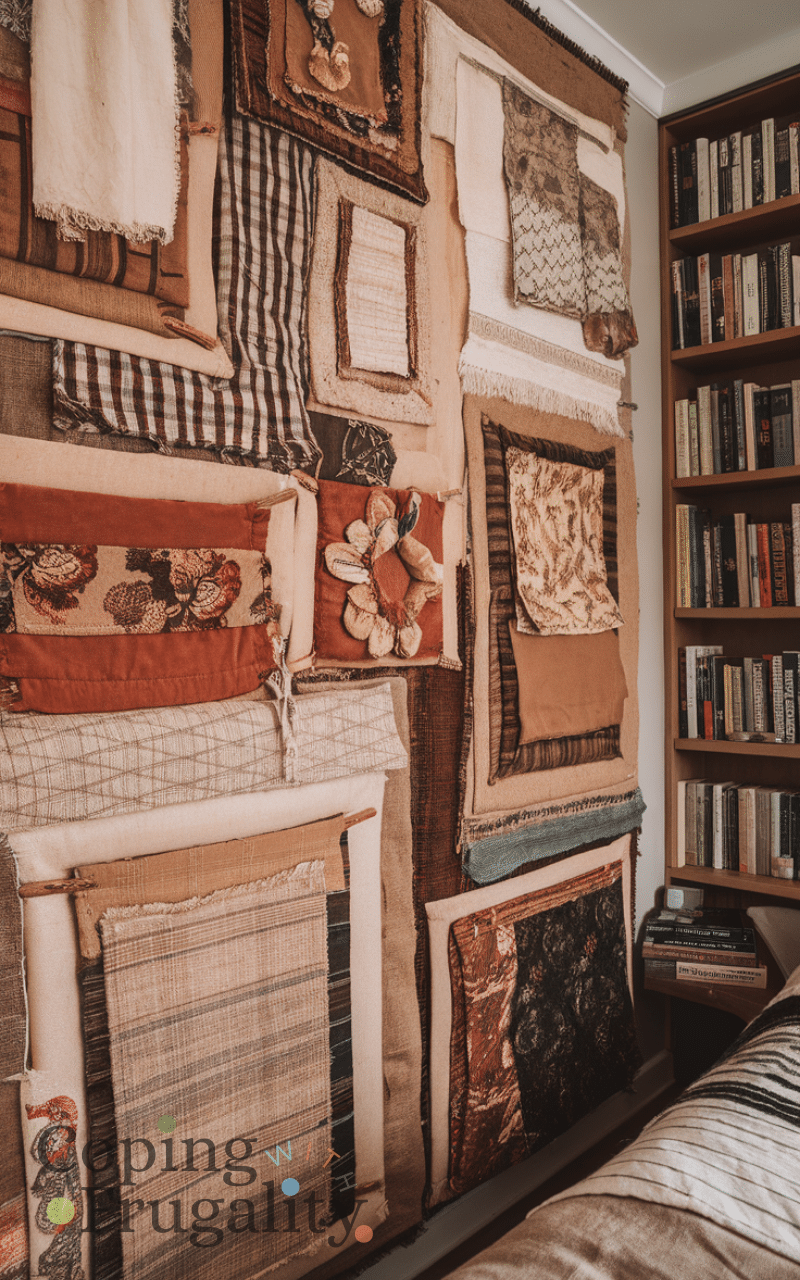
Use old fabric scraps to create textured wall panels. Stretch fabric over lightweight frames or glue directly to the wall in layered designs. This DIY wall texture idea on a budget allows you to add softness, color, and pattern while repurposing materials you already have. It’s especially effective for bedrooms or reading nooks, giving a cozy, boutique-style vibe. Fabric panels can also double as acoustic dampeners, making your space quieter and stylish. Experiment with different textures, like linen, cotton, or velvet, for a layered, rich look.
I’ve spent anywhere from $50–$200 on fabric panels, depending on whether I thrifted fabric or splurged on linen. My best savings trick is checking thrift stores for curtains—you get a lot of yardage for very little money. I personally recommend sticking to thicker fabrics because thin cotton can look cheap once stretched. One mistake people make is ignoring wall prep; dust will weaken adhesive over time. Secure mounting matters just as much as the fabric choice.
11. Aluminum Foil Accents
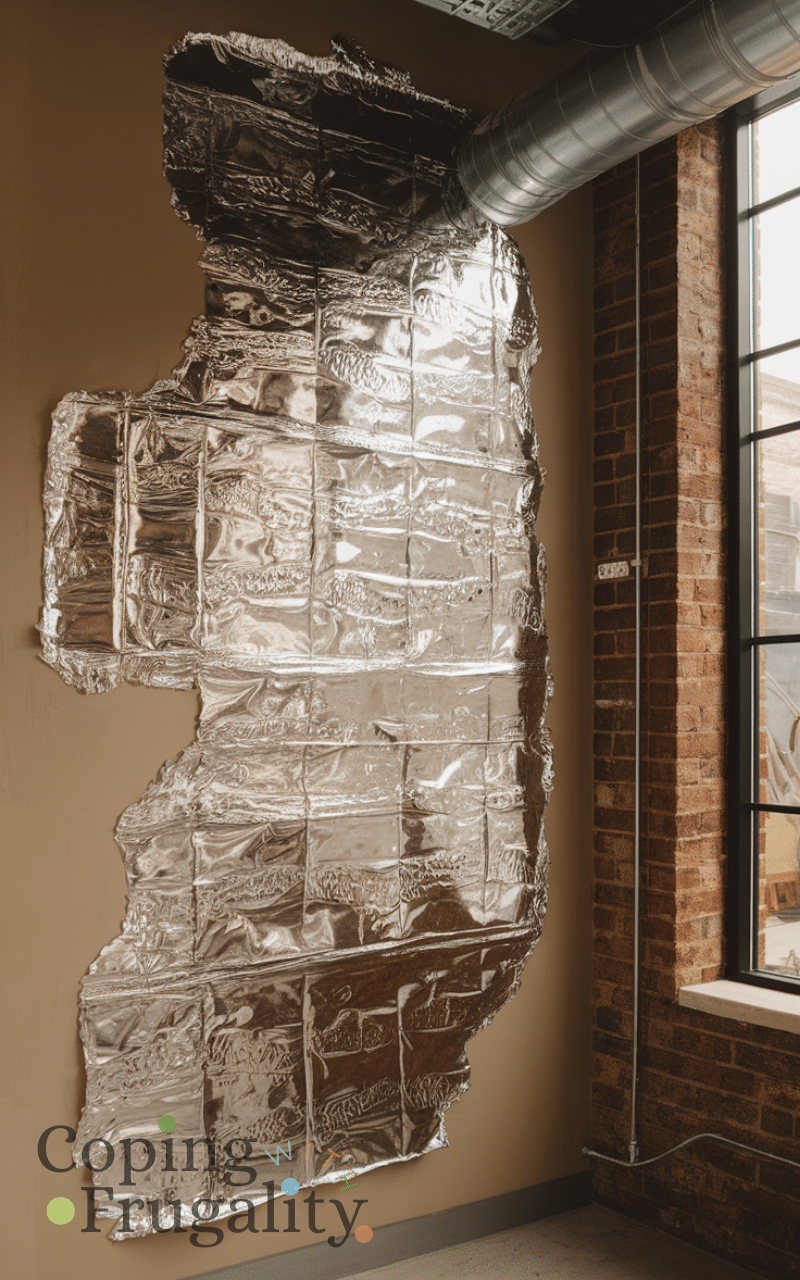
Aluminum foil can be shaped, crumpled, or folded to make shiny textured accents on your walls. Paint over it for a metallic wall effect or leave it reflective for a bold statement. This DIY wall texture idea on a budget is ideal for creating modern, industrial-inspired spaces with minimal cost. Foil is flexible, lightweight, and easy to manipulate into unique textures or patterns. Perfect for small accent areas, this method instantly adds sparkle and dimension without requiring professional skills or expensive materials.
This one surprised me—I completed a small accent section for about $15–$50 total. The foil itself is inexpensive, so most of your budget goes toward paint and sealant. I suggest crumpling and flattening the foil first to soften the shine before applying. In my opinion, less is more here; covering an entire wall can feel overwhelming. The biggest mistake is skipping a primer coat, which can cause peeling later.
10. Painted Sponge Technique
A simple kitchen sponge can transform a flat wall into an artistic masterpiece. Dip a sponge into paint and dab onto the wall in layers for a textured, painterly effect. This DIY wall texture idea on a budget lets you play with multiple colors for depth and dimension. It’s beginner-friendly, mess-friendly, and completely customizable, making it perfect for renters or temporary spaces. The painted sponge technique creates a soft, dynamic look that elevates a room instantly while keeping costs minimal.
I’ve used this in rental spaces because it’s so forgiving, and it usually costs $25–$75 for paint and supplies. My favorite money-saving trick is buying sample-size paints for layered color instead of full gallons. I always recommend starting with a lighter base coat and building depth slowly. One common mistake is rushing the layering process before the first coat dries. Give it time—texture develops best when you’re patient.
9. Twine Wrapped Wall Hangings
Wrap old twine around nails, sticks, or frames to create intricate patterns on your wall. By layering or intertwining the twine, you create a tactile 3D design that stands out. This DIY wall texture idea on a budget is ideal for rustic or bohemian aesthetics. Twine is inexpensive, versatile, and easy to find around the house. Whether used as a feature piece or a series of smaller hangings, it transforms your walls into creative conversation pieces with minimal investment.
This project typically runs $30–$90 depending on the size. I save money by buying twine in bulk rolls from hardware stores rather than craft bundles. Personally, I think asymmetrical patterns look more modern and less “DIY.” A mistake I’ve made before is pulling the twine too tight, which can warp frames or loosen nails. Keep tension firm but gentle for a polished result.
8. Plastic Lid Art
Recycle plastic bottle caps or lids by gluing them in mosaic-like patterns on your wall. Paint them if desired to match your décor. This DIY wall texture idea on a budget turns everyday waste into playful, eye-catching art. The rounded, colorful shapes create depth and dimension, perfect for accent walls in kids’ rooms, kitchens, or craft spaces. It’s a fun, hands-on project that combines sustainability with style, giving your home a creative boost without spending money on fancy materials.
I’ve done this with kids and spent maybe $10–$40 mainly on adhesive and paint. My top tip is to sort lids by size first—it makes pattern planning much easier. I recommend painting everything one cohesive color if you want a more sophisticated look. The biggest mistake is using weak glue; hot glue alone may not last on vertical surfaces. Use strong construction adhesive for durability.
7. Leaf Printing
Collect leaves from your yard or local park, coat them in paint, and press them against your wall for organic texture. This DIY wall texture idea on a budget is simple, natural, and visually appealing. Leaf prints create unique patterns, and no two walls will look alike, giving your space a custom feel. Perfect for living rooms, bedrooms, or even entryways, this technique brings nature indoors and adds a calming, textured vibe. It’s a low-cost way to make your walls artistic and memorable.
This one cost me under $20–$50 since I only needed paint. I always suggest choosing sturdy leaves with defined veins—they stamp much better than thin ones. In my experience, neutral tones feel timeless compared to bright greens. A common mistake is applying too much paint to the leaf, which blurs the details. Light coats create the prettiest impressions.
6. Fabric Twists and Knots
Take long strips of old fabric and twist or knot them on the wall in patterns. This DIY wall texture idea on a budget adds movement and dimension, creating a tactile feature wall. It works beautifully for boho-style rooms or cozy corners and can be painted for additional flair. Using materials you already own keeps costs low while allowing endless creativity. This method transforms plain walls into dynamic focal points with minimal effort and maximum charm.
I’ve spent about $20–$80 on this depending on whether I used scrap fabric or purchased yardage. My money-saving advice is cutting up old bedsheets—they twist beautifully and cost nothing. I recommend sticking to a consistent color palette so it looks curated, not messy. One mistake is overcrowding the wall; negative space makes the texture stand out more. Plan your layout before attaching anything permanently.
5. Cork Mosaic Panels
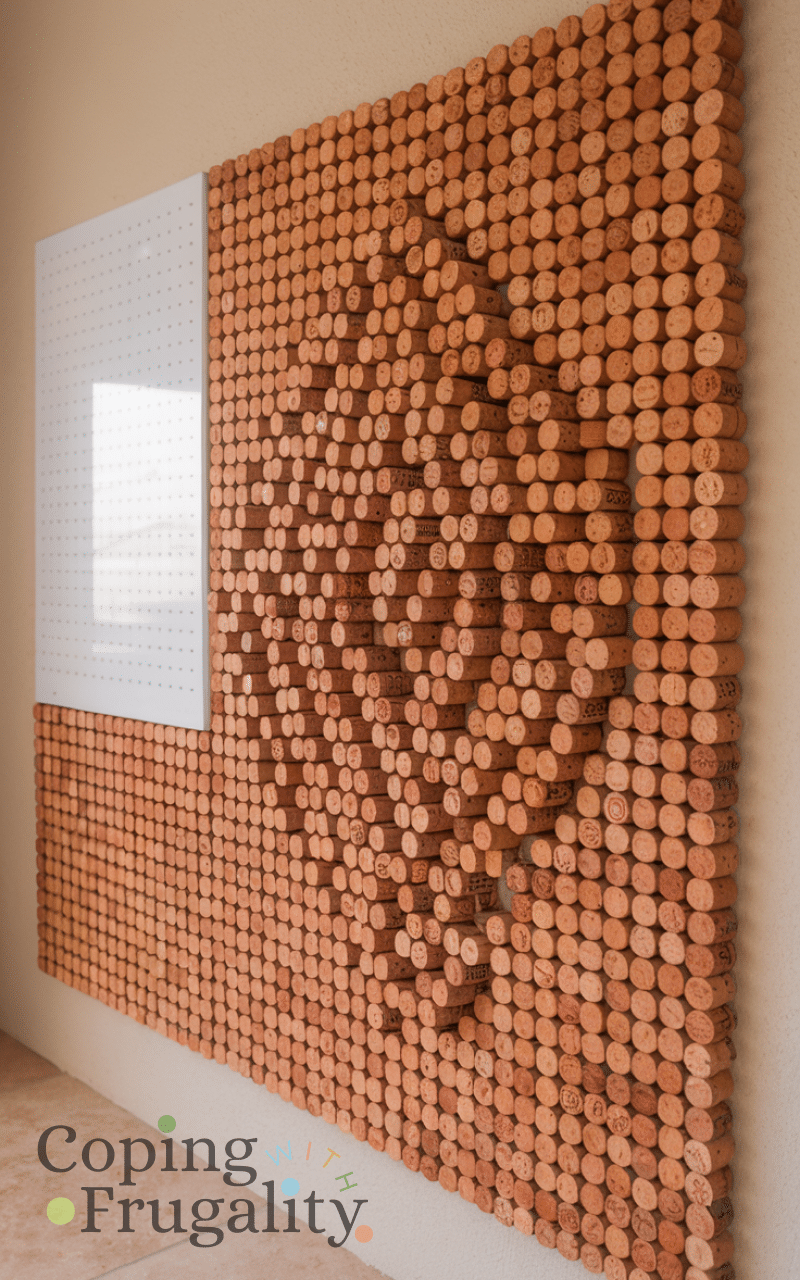
Use leftover wine corks to create textured wall mosaics. Slice corks in halves or quarters, then arrange them in patterns for a 3D effect. This DIY wall texture idea on a budget is eco-friendly and visually appealing. Cork is lightweight, easy to work with, and adds a warm, natural tone to your home. Perfect for kitchens, offices, or living areas, cork mosaics offer both texture and functionality, as they can double as pinboards for notes and photos.
If you’re collecting corks slowly, this can cost almost nothing, but buying them runs about $40–$150 for a medium wall area. I save by asking friends and local restaurants to save corks for me. I strongly recommend sealing cork with a clear coat to prevent crumbling. A mistake people make is not trimming cork evenly, which creates awkward gaps. Precision makes this look high-end.
4. Pasta Art Texture

Dry pasta can become a quirky wall decoration when glued in creative patterns. From spirals to shells, the shapes create a fun, dimensional look. This DIY wall texture idea on a budget uses inexpensive household items to make a bold statement. Once painted, pasta walls can mimic modern, abstract art. It’s playful, tactile, and ideal for kids’ spaces or craft rooms. Pasta art transforms ordinary walls into conversation starters without spending on professional décor.
I’ve experimented with this for under $15–$45 since dry pasta is inexpensive. My tip is buying generic bulk pasta—it works exactly the same once painted. Personally, I prefer sticking to one pasta shape for a cleaner aesthetic. The biggest mistake is not sealing the pasta properly before painting, which can attract moisture. A solid primer and sealant are essential.
3. Paper Quilling Panels
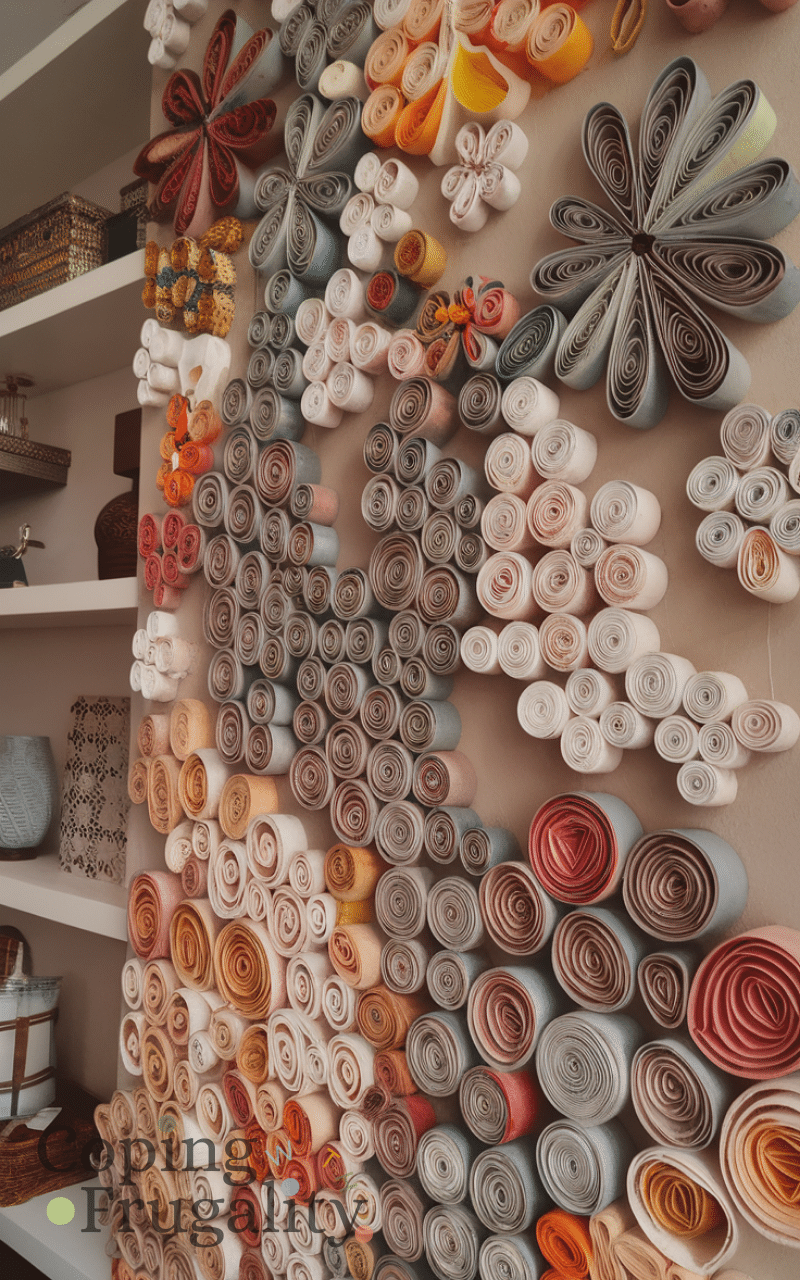
Roll strips of paper into coils and arrange them in patterns on the wall. This DIY wall texture idea on a budget is perfect for adding delicate, intricate textures without spending money. Paper quilling allows you to create flowers, spirals, or geometric designs that bring walls to life. It’s an affordable craft that reuses scrap paper and adds a whimsical, handmade touch to your home. Ideal for accent walls or gallery displays, paper quilling makes decorating fun and inexpensive.
I’ve made quilling panels for around $15–$60 depending on scale. Cutting your own strips from scrap paper saves more than buying pre-cut kits. I recommend working on removable panels instead of directly on drywall for flexibility. One mistake I see often is inconsistent coil sizes, which makes the design look sloppy. Take your time—precision is what elevates this craft.
2. Card Stock Wall Art
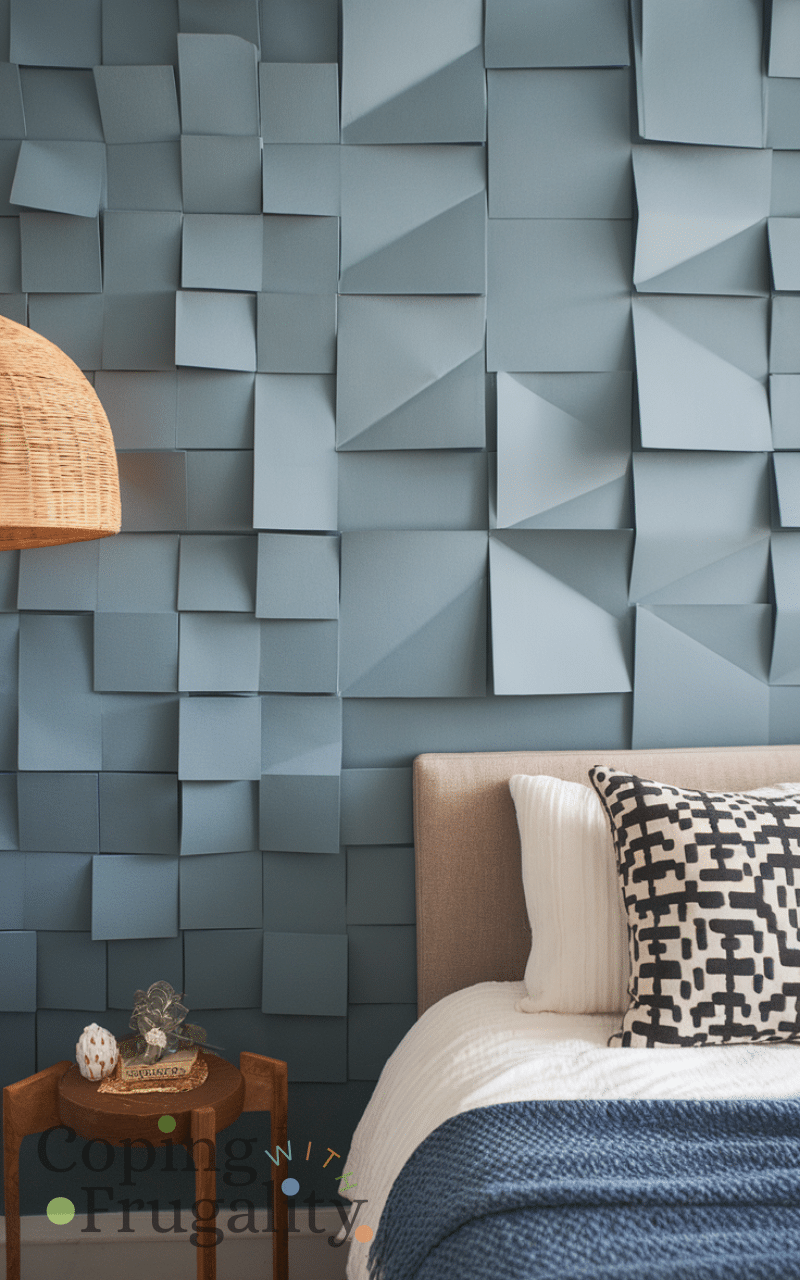
Use thick cardstock to create geometric patterns, layered shapes, or 3D designs on your wall. This DIY wall texture idea on a budget gives a modern, structured look without professional tools. Cardstock can be painted, cut into precise shapes, or folded for dimension. Perfect for bedrooms, offices, or living rooms, it provides a bold, clean texture that elevates your wall style affordably. Layering and arranging pieces creatively ensures each wall becomes unique and eye-catching.
This project usually costs me $30–$100 depending on paper quality. I save money by buying cardstock in bulk packs rather than specialty sheets. I strongly suggest using a template to keep shapes consistent. A common mistake is skipping proper adhesive—thin glue can cause corners to peel. A clean, structured layout makes this look professionally installed.
1. Upcycled Book Page Collage
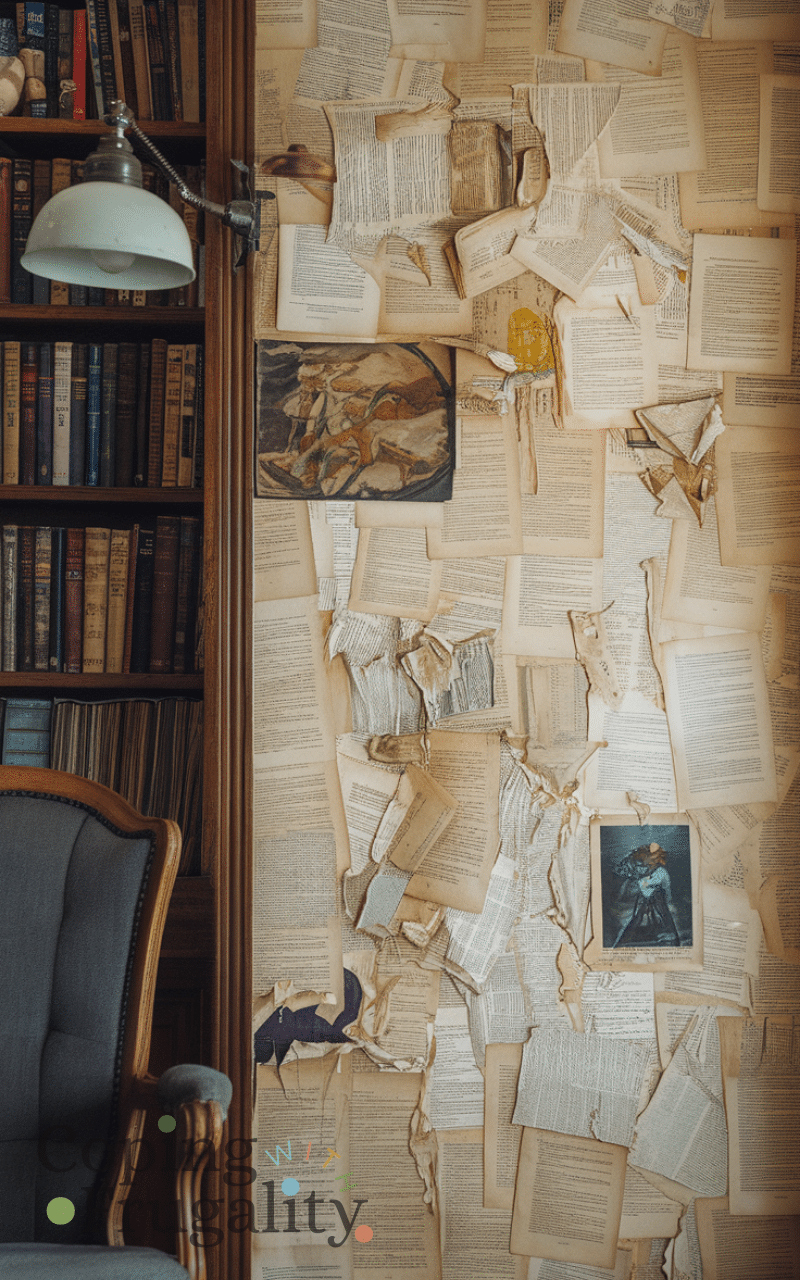
Use old book pages to cover an accent wall with a layered, textural design. Tear, fold, or crumple pages for different effects, then glue them down for a literary-inspired feature. This DIY wall texture idea on a budget gives walls character, charm, and a sense of history. It’s perfect for reading nooks, libraries, or living rooms and adds a tactile, creative element. You can even mix in illustrations or colored pages for extra flair, turning recycled materials into stunning wall décor.
I’ve completed a full accent wall for about $40–$120, mostly for sealant and adhesive. My money-saving trick is sourcing damaged books from thrift stores for pennies. I personally love slightly tearing the edges—it adds texture and charm. The mistake many people make is not sealing thoroughly, which can lead to peeling over time. Done right, this creates one of the coziest, most character-filled walls in a home.
Conclusion
DIY wall texture ideas on a budget prove that you don’t need to spend a fortune to transform your space. From recycled materials like cardboard, cork, and old books to creative techniques like sponge painting and leaf printing, these ideas bring personality and charm to any room. Try these DIY wall texture ideas on a budget and watch your home come alive with creativity. Subscribe to my blog for more inspiring decorating tips, fun challenges, and budget-friendly ideas that make every space uniquely yours!