Everything can be done with budget
14 DIY Pet Feeding Station Ideas on a Budget You’ll Love
I love how a DIY Pet Feeding Station can be both practical and beautiful at the same time. When I built mine, I wanted something that didn’t scream “pet corner” but actually blended into my kitchen like real furniture. Black cabinets, brass hardware, and a warm wood top made it feel intentional, not like an afterthought. That’s the biggest win for me with a DIY Pet Feeding Station, everything stays organized while still matching the rest of my home.
What surprised me most during this DIY Pet Feeding Station project was how much I learned along the way. Installing soft-close hinges was way easier than I expected, especially with the right jig, but drawers definitely tested my patience. The first one wasn’t perfect, but by the second try, things clicked. Taking the time to practice joinery and slow down made the finished piece feel solid and well-built, not rushed or flimsy.
In the end, the details made all the difference. Mounting it to the wall gave me peace of mind, especially with kids and pets around, and keeping the water station separate just made more sense for daily use. I love how this DIY Pet Feeding Station keeps bowls and food out of sight while still looking like part of the decor. It actually fits naturally alongside ideas I already use in Living Room Decor, where function and style need to live together without fighting for attention.
Why you need to choose these DIY Pet Feeding Station Ideas
Creating a DIY pet feeding station is a smart way to keep your furry friend’s eating area organized, clean, and personalized. It not only reduces mess from spilled food and water but also adds a stylish touch to your home decor. By making it yourself, you can tailor the height, size, and materials to suit your pet’s specific needs, ensuring comfort and convenience during mealtime.
Some helpful tips to consider
When building your DIY feeding station, think about durability and ease of cleaning. Opt for materials that can withstand spills and are simple to wipe down, like sealed wood or washable trays. Ensure the bowls are stable to prevent tipping and choose a design that keeps water and food off the floor. Adding storage for extra food or treats can also make your station more functional and efficient.
14. Simple Tray Feeding Station
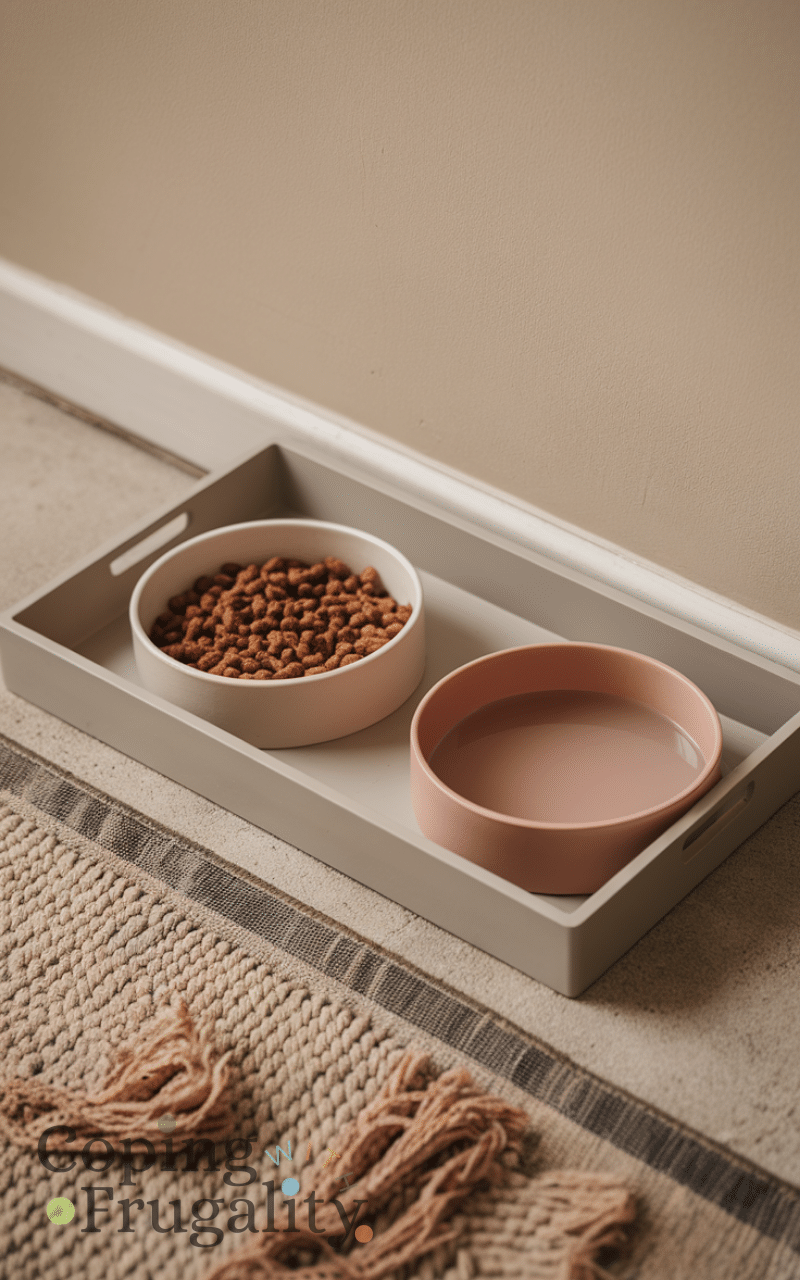
One of the easiest DIY pet feeding station ideas on a budget is using a sturdy tray. Place your pet’s bowls on a large decorative or plastic tray to contain spills and crumbs. This keeps floors protected and instantly creates a defined feeding zone.
It’s renter-friendly, requires zero tools, and can easily be moved or cleaned. Choose a tray that complements your kitchen color palette for a more cohesive look.
I started with a simple tray when I first tried to contain my cat’s spills — total cost around $10–$25. I like that it’s portable and renter-friendly, and I can swap it out if I redecorate. My money-saving tip: thrift trays or use a decorative platter from around the house instead of buying a new one. I recommend picking one that complements your kitchen so it doesn’t feel like a random pet accessory. A mistake people make is choosing trays that are too small, which just shifts mess to the floor.
13. Wooden Crate Feeding Station
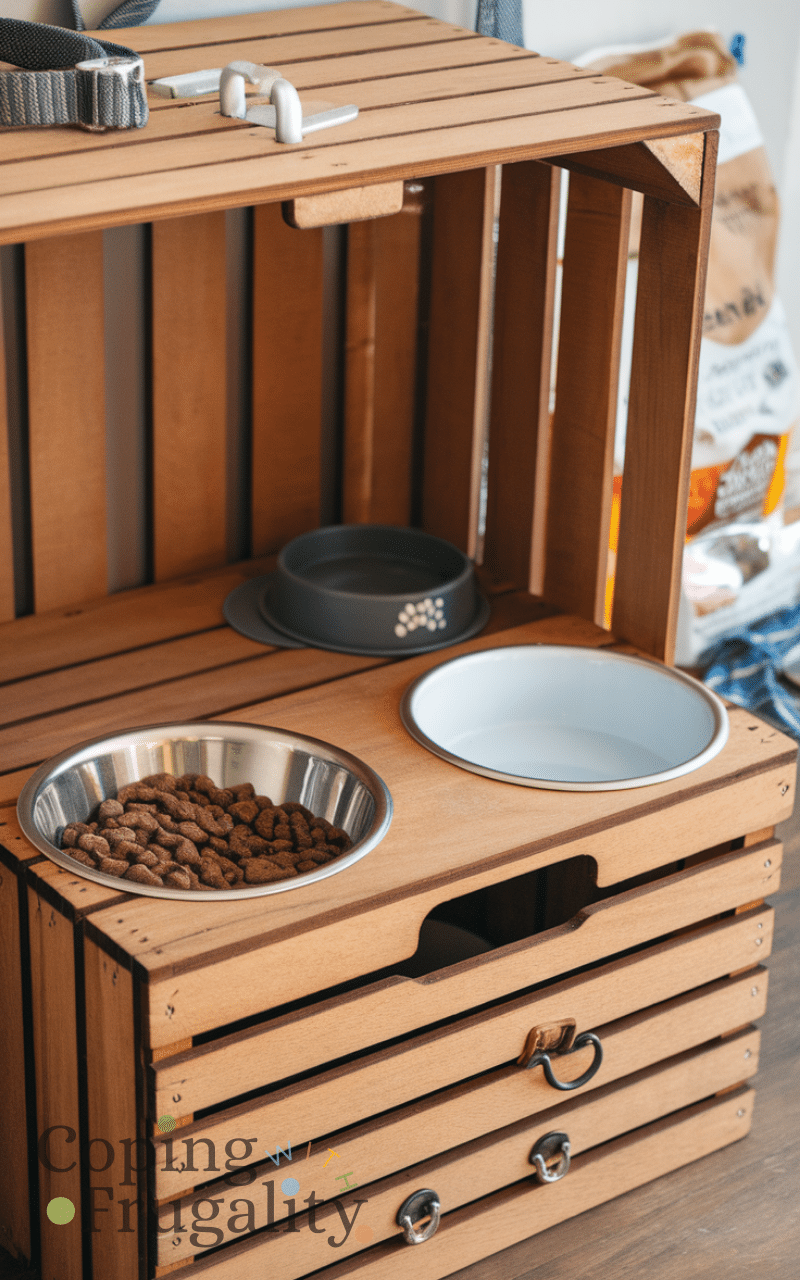
A wooden crate can quickly become a charming feeding station. Turn it sideways to create storage for food bags or treats, and place bowls on top or inside.
You can stain or paint the crate to match your decor. This option adds a rustic or farmhouse touch while staying affordable and functional.
I love how a wooden crate can double as storage and a feeding spot. I stained one for about $15–$40, and it instantly added a rustic charm to my kitchen. My money-saver: check local freecycle groups or hardware leftovers — crates are everywhere. I recommend securing it properly so pets don’t tip it while eating. People often forget to sand edges, and rough wood can scratch floors or snag paws.
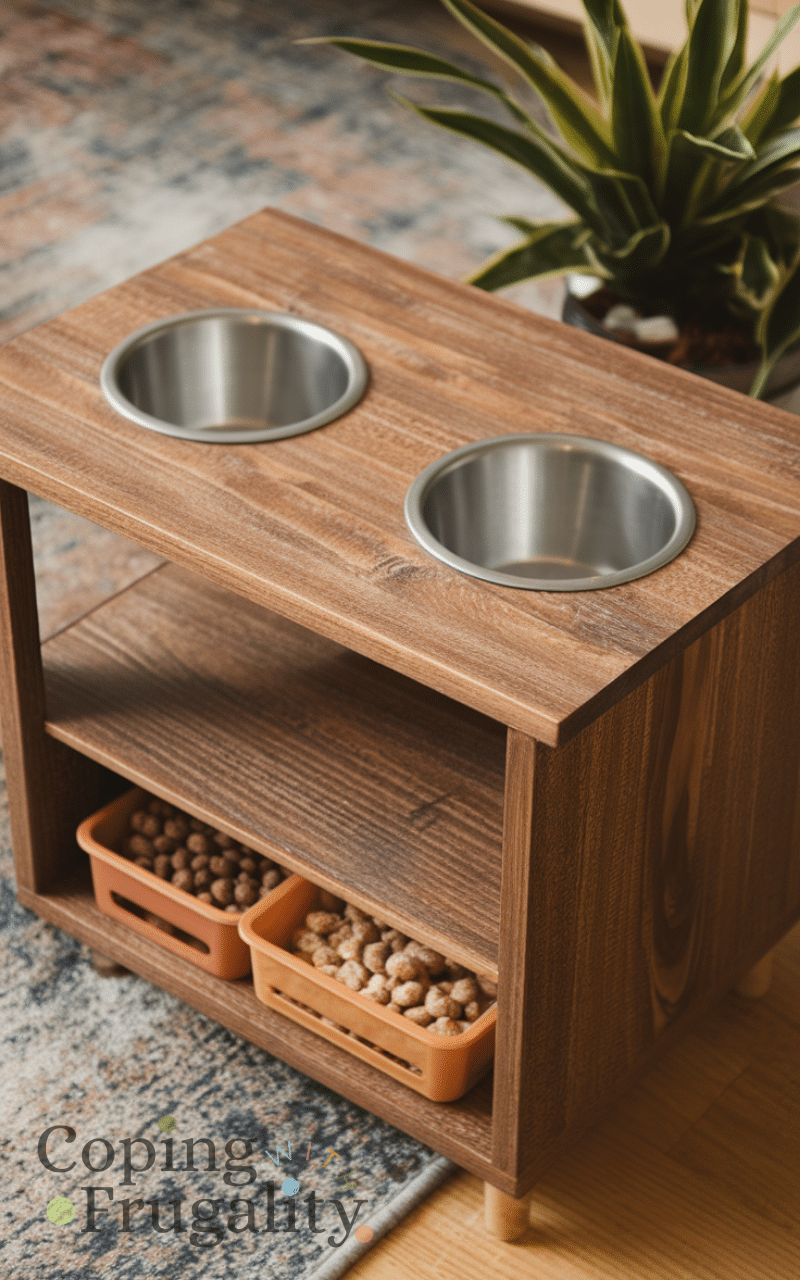
12. Raised Bowl With Scrap Wood
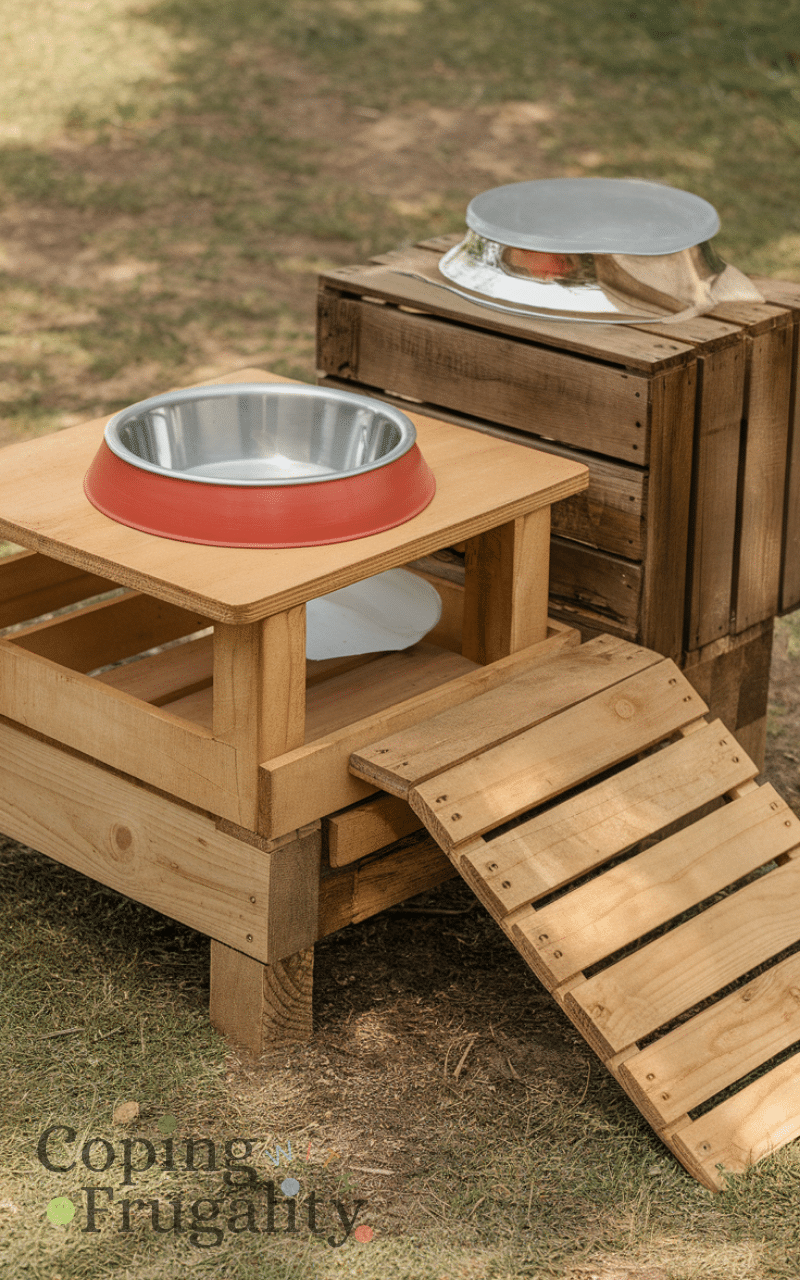
If you have leftover wood pieces, you can build a simple raised feeding stand. Cut circular openings to hold stainless steel bowls securely.
Elevated feeding can help improve posture for some pets and keeps bowls off the floor, reducing mess and making cleaning easier.
Using leftover wood to make a raised feeder cost me basically nothing — maybe $5–$15 for finishing touches. I like that my pets eat comfortably and the bowls don’t slide around. Tip: measure your pet’s height carefully to avoid neck strain. I always recommend sealing the wood to prevent water damage. A common mistake is cutting openings too tight; the bowls need to fit snugly but not be impossible to remove for cleaning.
11. Drawer Feeding Station
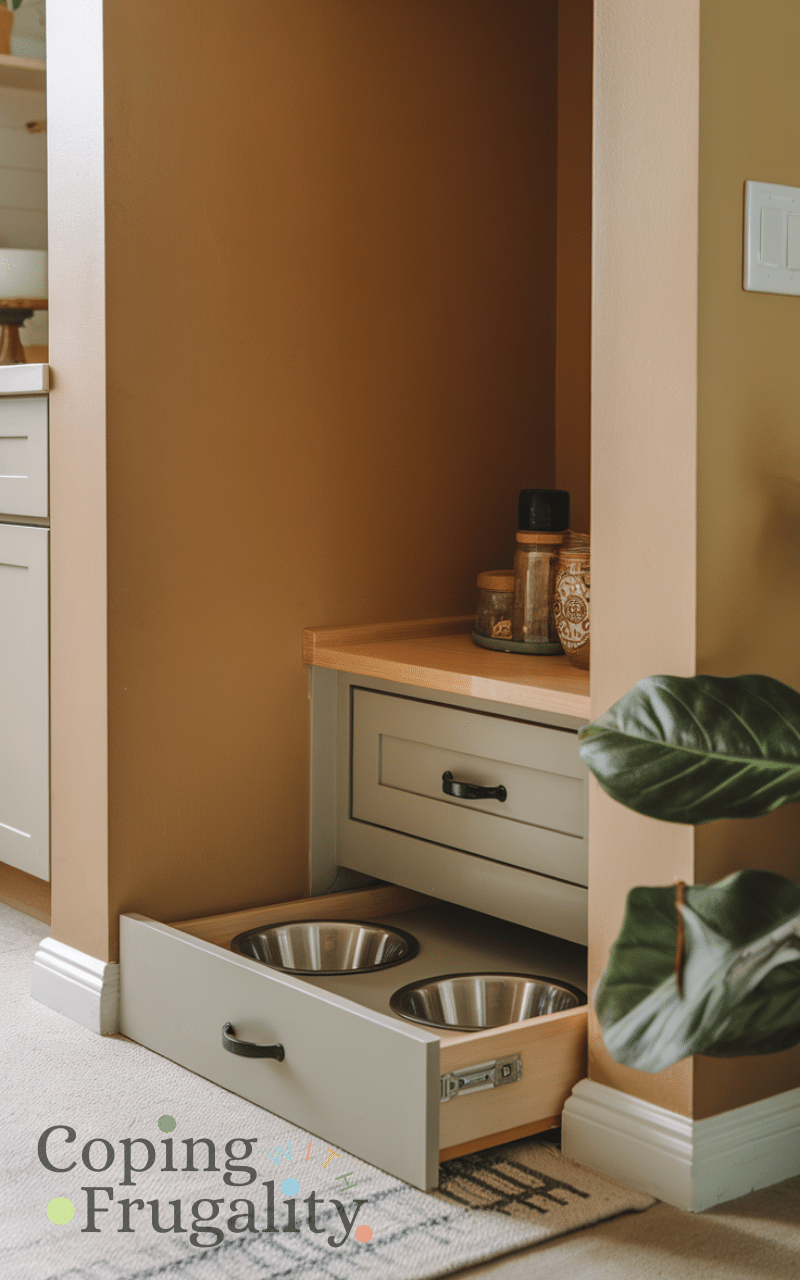
Transform a lower kitchen drawer into a hidden feeding area. When it’s mealtime, simply pull the drawer out. When finished, push it back in to keep everything out of sight.
This solution works especially well in small kitchens and helps maintain a clean, clutter-free look.
Turning a drawer into a hidden feeding station was surprisingly easy and cost about $10–$50, depending on whether I needed liners or trays. I love that it disappears when not in use — the kitchen looks tidy instantly. Money-saving tip: use liners you already have instead of buying new ones. My recommendation? Only do this with sturdy drawers; flimsy ones can sag under water bowls. Many people try this in deep drawers without support, which leads to spills and frustration.
10. Repurposed Side Table
An old side table can be upcycled into a stylish feeding station. Cut holes in the tabletop for bowls and use the lower shelf for food storage.
This gives you a furniture-style look without the price of custom cabinetry.
I transformed an old side table into a feeding station for about $20–$60. Cutting holes for bowls was nerve-wracking at first, but the finished piece looks like intentional furniture. Tip: paint or stain to match existing décor for cohesion. I strongly recommend using adjustable or removable bowls so you can clean them easily. A mistake people make is using tables with thin tops — the weight of water and food can warp them.
9. Wall-Mounted Feeding Station
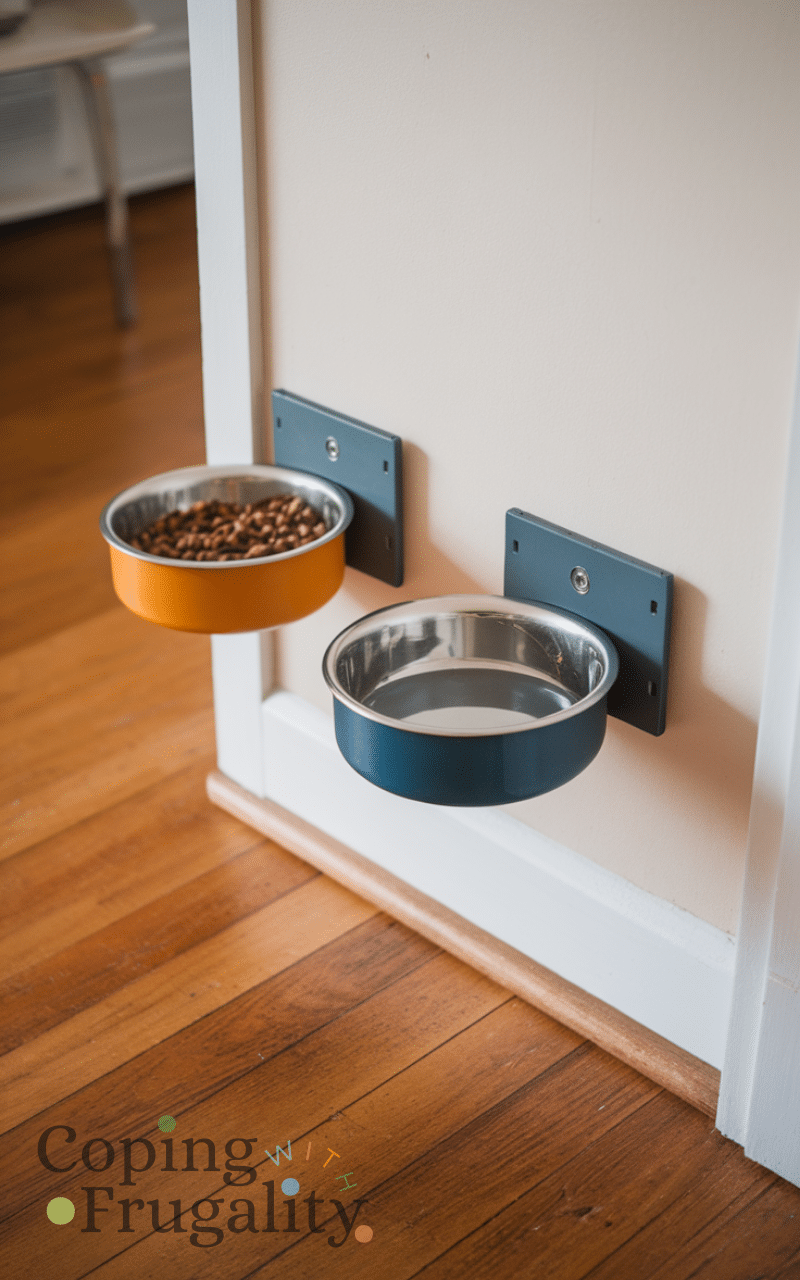
Wall-mounted bowl brackets are perfect for saving floor space. Secure them at the right height for your pet to create a floating feeding station.
This works especially well in apartments and prevents bowls from sliding around during meals.
For apartments, wall-mounted feeders were a lifesaver. I spent around $25–$70 on brackets and bowls, and the floor stays clean. Tip: double-check height for your pet — too high and they strain, too low and they spill. I recommend securing it into studs rather than drywall alone. People often mount them too close to corners, making it awkward for the pet to approach.
8. Plastic Bin Food Storage Station
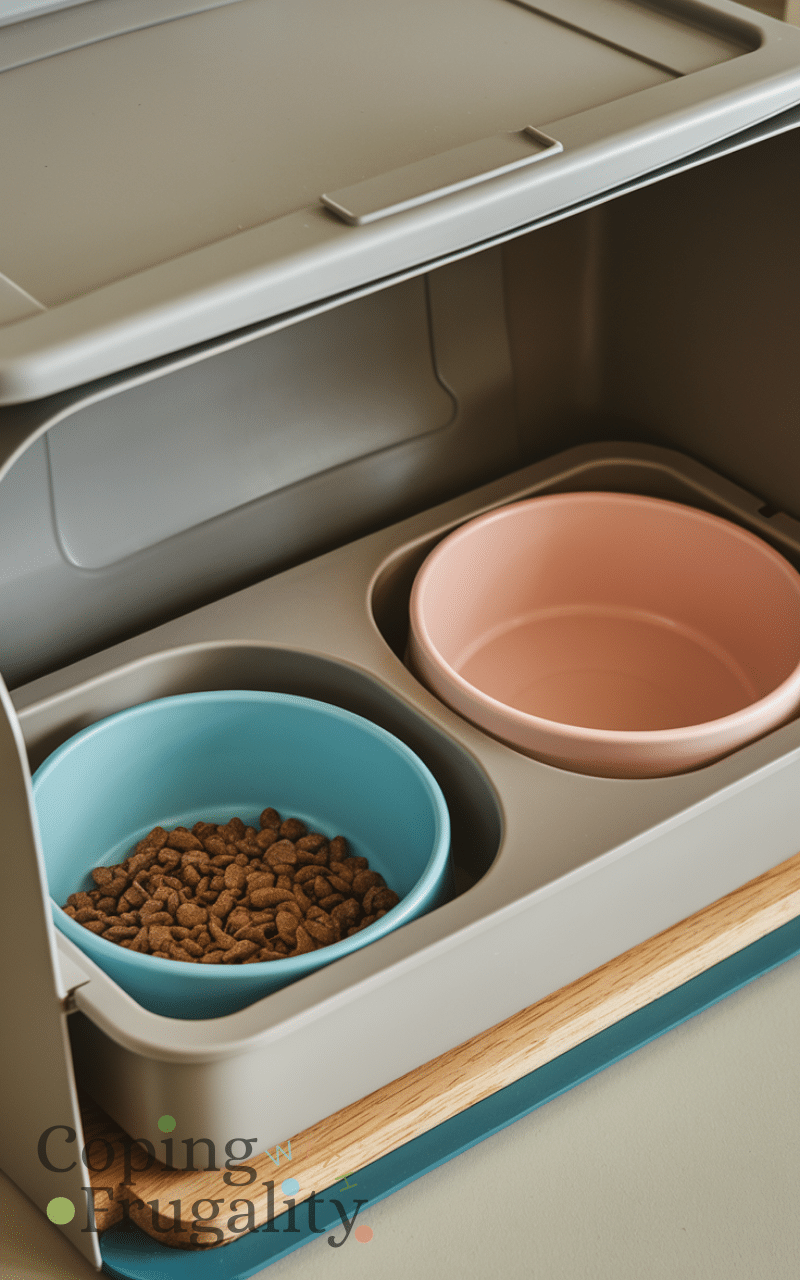
Pairing bowls with an airtight plastic storage bin keeps food fresh and accessible. Store kibble inside and place bowls nearby for a streamlined feeding routine.
This is one of the most practical DIY pet feeding station ideas on a budget, especially for larger dogs with big food bags.
I keep kibble in a plastic bin next to the feeding area for $15–$35, and it’s airtight and easy to access. I like that it keeps food fresh while staying budget-friendly. My tip: label bins for different pets or flavors to save confusion. I recommend matching the bin color to your kitchen palette. A common mistake is choosing a bin that’s too big to move, which makes refilling a hassle.
7. Feeding Station With Placemat Base
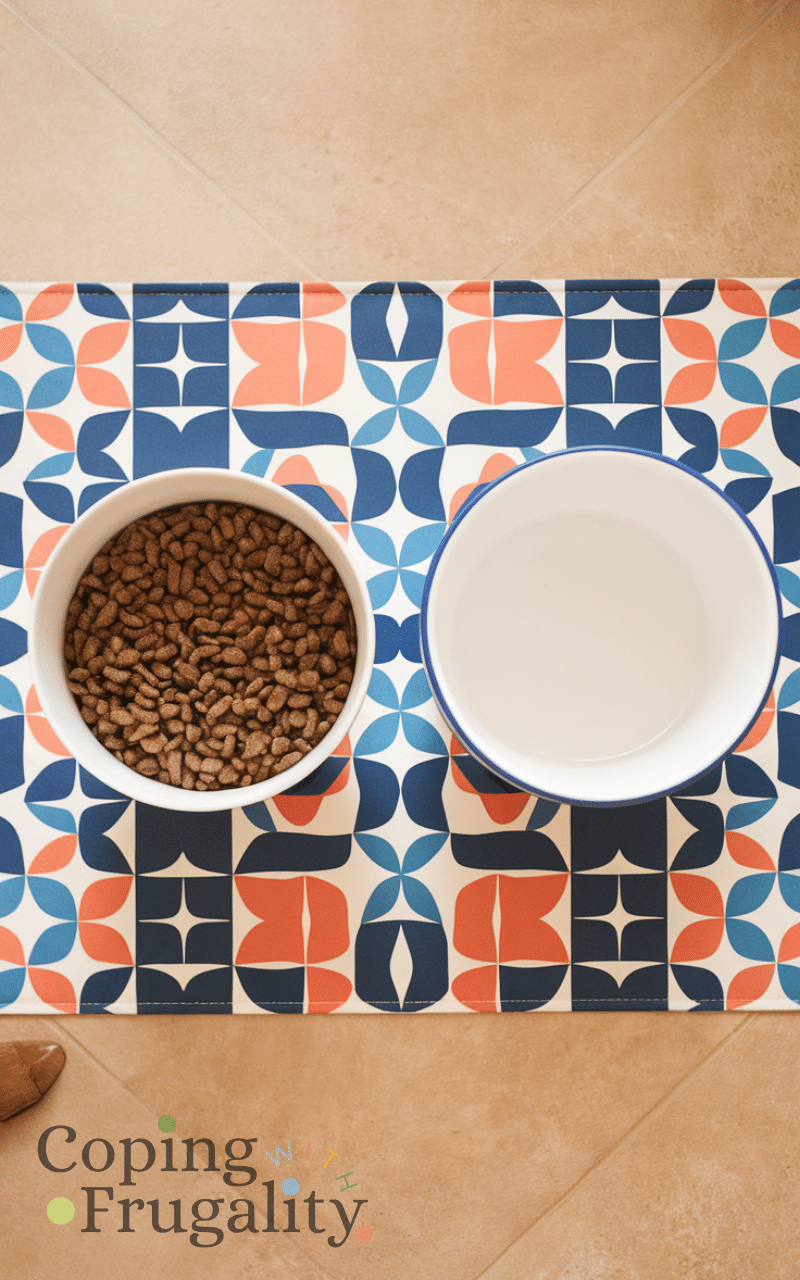
A washable placemat or silicone mat placed under bowls protects your flooring from spills. Choose a neutral or patterned design that complements your decor.
It’s inexpensive, easy to clean, and adds a small decorative touch.
A silicone mat under the bowls cost me $5–$15 and instantly protected the floor. I love that it’s easy to wash and adds a small decorative touch. Money-saving tip: repurpose old placemats instead of buying new ones. I strongly recommend one with raised edges to catch spills. People often place mats that are too small, which defeats the purpose.
6. Built-In Corner Feeding Station
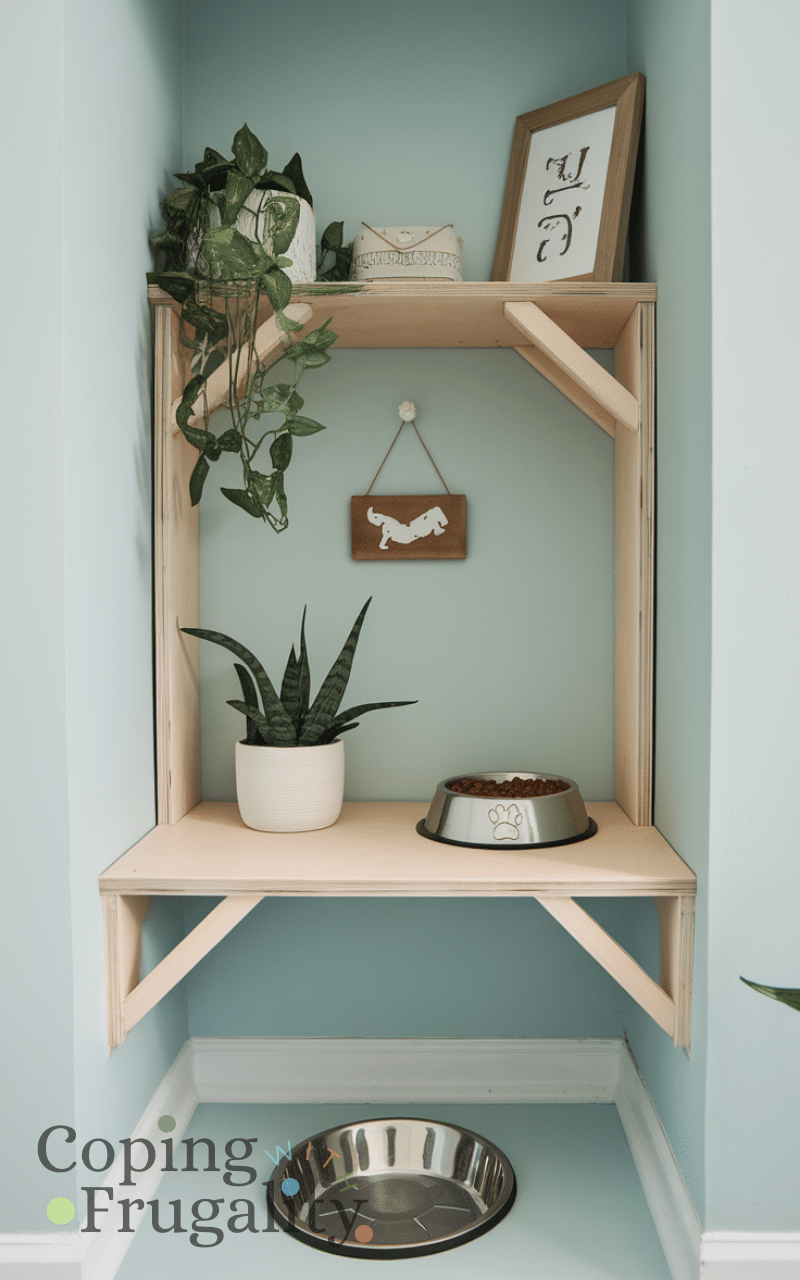
Unused kitchen or laundry room corners are perfect for a designated feeding spot. Add a small shelf, cabinet, or simple raised stand to define the space.
Keeping bowls tucked into a corner prevents them from blocking walkways and makes the area feel intentional.
I converted a corner into a small feeding station for around $30–$80, using a shelf and raised platform. It keeps everything tucked away yet accessible. Tip: measure the corner carefully to maximize space. I recommend a warm wood or painted finish so it feels integrated into the kitchen. A common mistake is leaving bowls flush against walls; a small gap prevents messes from accumulating behind them.
5. Repurposed Cabinet Feeding Station
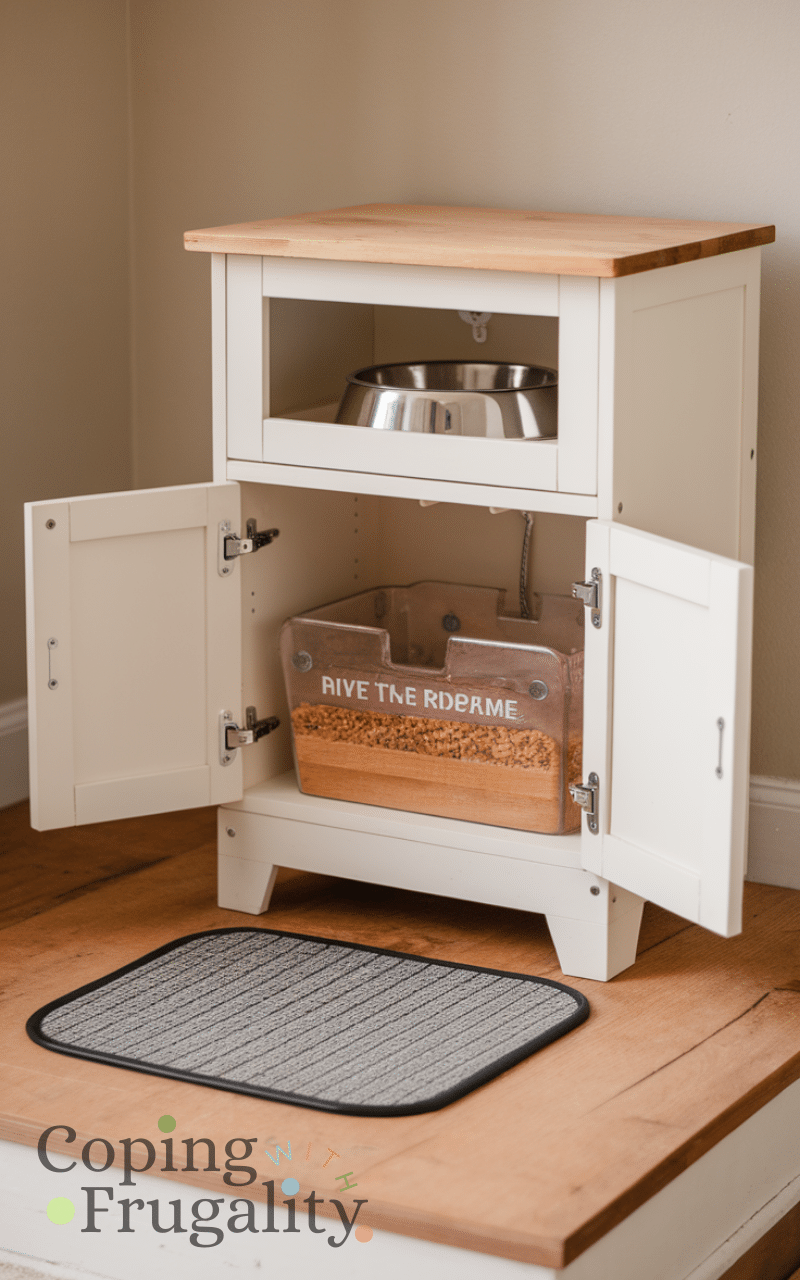
Transform a small cabinet into a feeding station by cutting bowl openings into the top. Store food, treats, and scoops inside for a clutter-free look.
Paint it to match your kitchen cabinetry for a seamless appearance.
Turning a small cabinet into a feeding station cost me $40–$100, depending on paint and liners. I love that it hides everything while matching the rest of the cabinetry. Tip: use silicone liners or trays to make cleaning effortless. My recommendation is to secure bowls inside cutouts so pets can’t tip them. Many people forget to ventilate cabinets for dry kibble, which can lead to stale food.
4. Concrete Bowl Holder

For a modern, industrial look, create a concrete bowl base using a simple mold. Concrete is heavy and durable, making it great for larger pets who tend to push bowls around.
You can customize the size and shape to fit your space.
I experimented with a concrete bowl holder for about $20–$60, and it’s surprisingly chic and heavy enough to stay put. I like that it gives a modern industrial vibe. Money-saving tip: use scrap concrete or small molds rather than buying pre-made holders. I recommend sealing the concrete to prevent water stains. A common mistake is making it too shallow — the bowls must sit securely without wobbling.
3. Feeding Station With Hooks and Labels
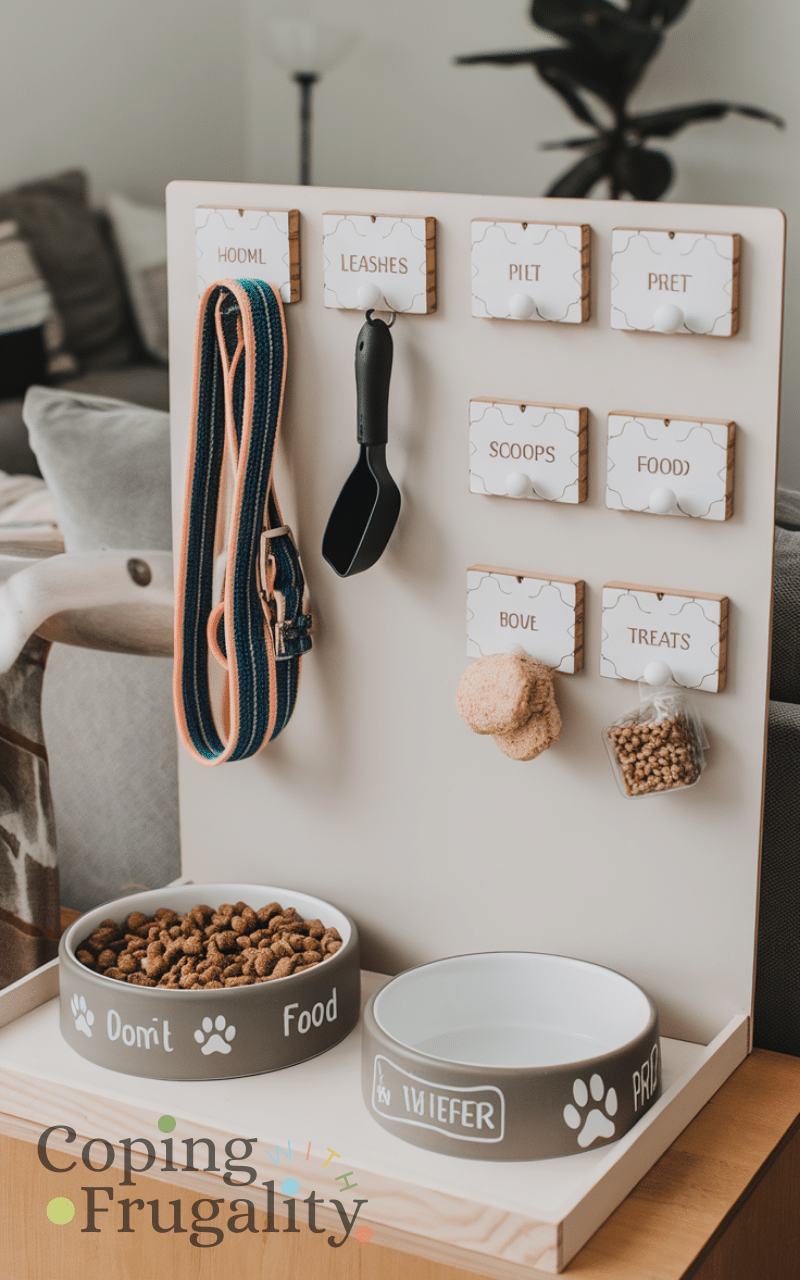
Add small hooks above or beside the feeding area for leashes and harnesses. Use labeled jars or containers for treats and food scoops.
This turns the feeding zone into a fully organized pet station rather than just a bowl area.
Adding hooks and labels cost me around $10–$30, and suddenly leashes, scoops, and treats all have a home. I love the functional organization it brings. Tip: use inexpensive adhesive hooks to save wall damage and money. I recommend grouping items logically so your pet routine flows smoothly. A mistake people make is cluttering hooks with unrelated items, which makes the area messy.
2. Elevated Feeder Using Bricks or Blocks
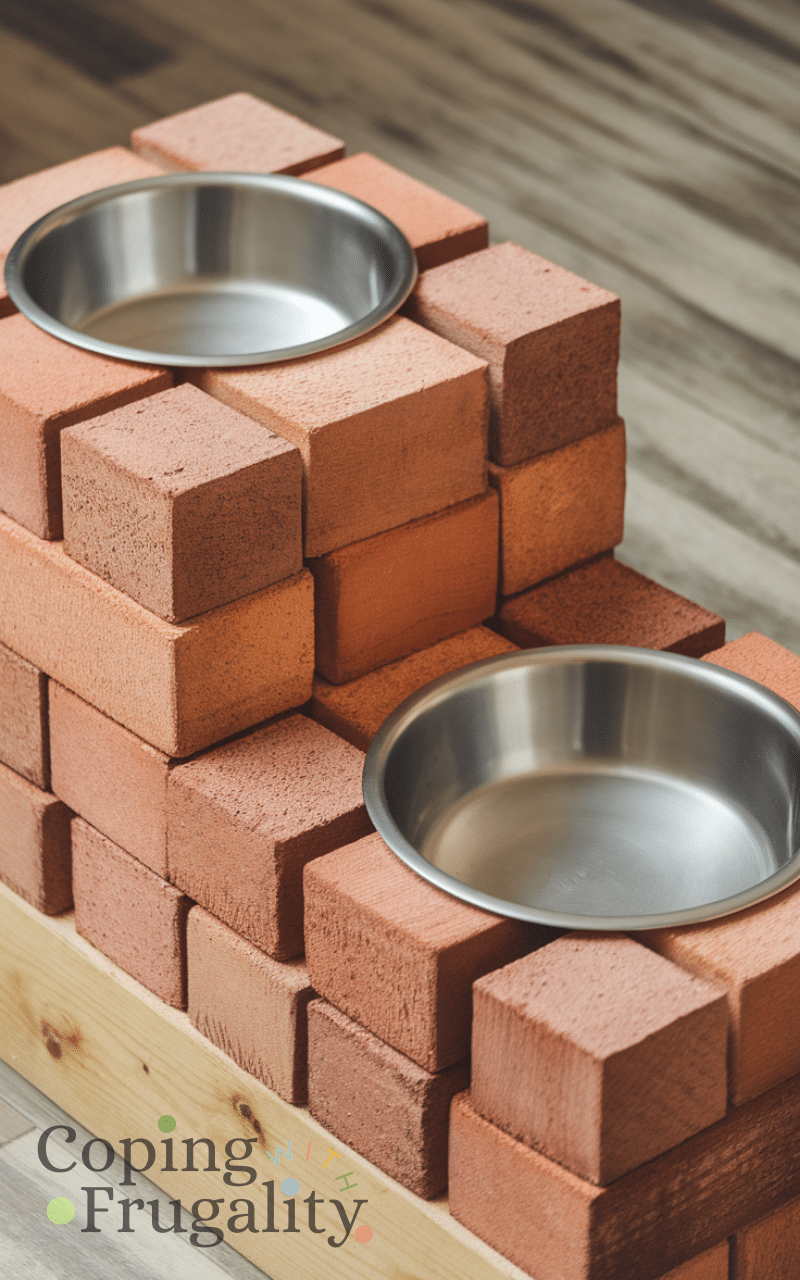
Stacking bricks, pavers, or decorative blocks under bowls creates a quick raised feeder. You can paint the bricks to match your decor for a cleaner look.
It’s sturdy, adjustable, and perfect for pets that benefit from elevated feeding.
I stacked bricks for a DIY elevated feeder for under $15, painting them to match my decor. It’s sturdy and height-appropriate for my pets. Tip: test stability before letting your pets use it. I recommend covering edges with felt or cork to protect floors. Many people forget this and end up with scratched floors after a few weeks.
1. Minimal Feeding Station With Storage Basket
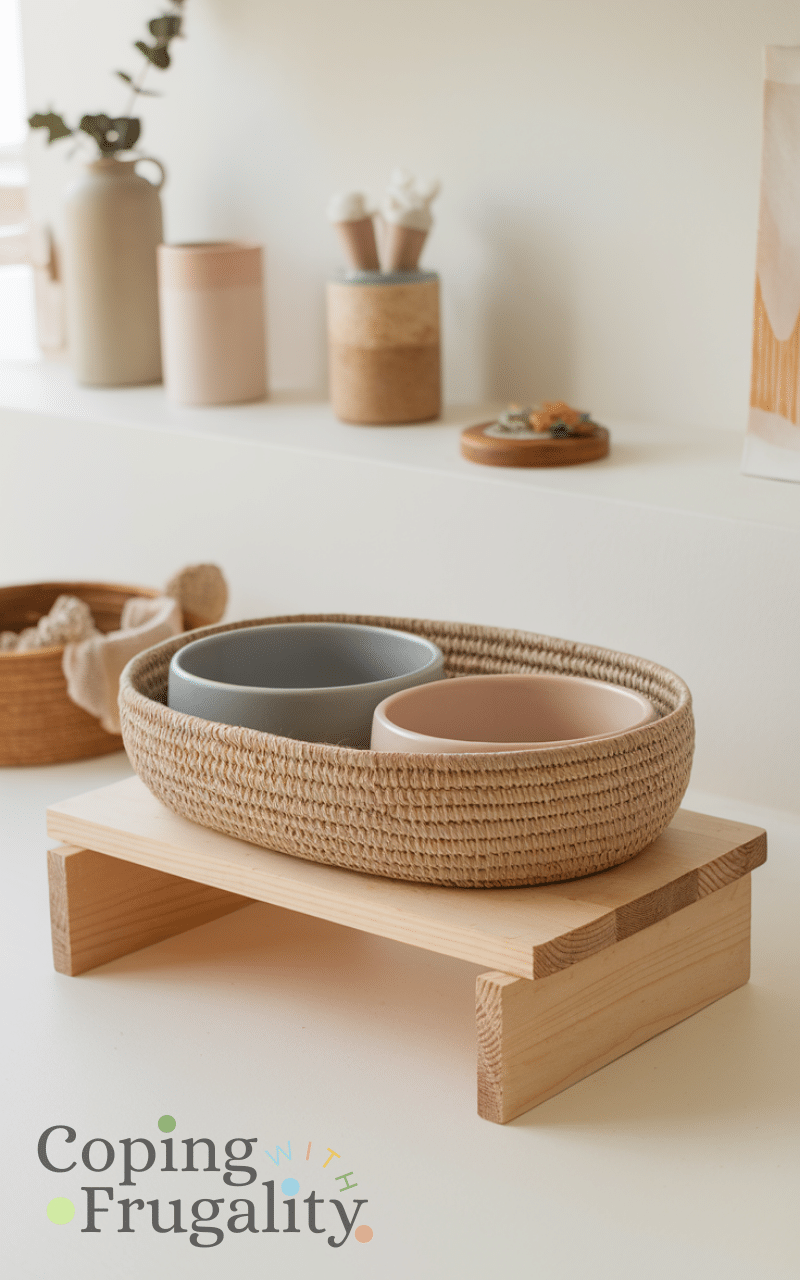
For a simple and modern look, use a woven basket to store food and supplies while placing bowls neatly beside it.
This option blends effortlessly into living spaces and keeps clutter contained while maintaining a clean aesthetic.
I love this option because it blends perfectly into the kitchen for around $20–$50. My cat’s bowls sit beside a basket holding food and supplies, keeping the area tidy. Tip: rotate baskets or liners for easy cleaning. I recommend choosing a basket with a tight weave so kibble doesn’t spill. The common mistake is using an oversized basket that dominates the space and looks cluttered.
Conclusion
DIY pet feeding station ideas on a budget prove that you don’t need expensive custom furniture to create a beautiful and functional feeding space. With simple materials, creative repurposing, and thoughtful design, you can keep your home organized while making mealtime easier for your pet.
Whether you prefer hidden storage, elevated feeders, or minimalist setups, there’s a solution that fits your style and space. A well-designed DIY Pet Feeding Station doesn’t just serve a purpose—it becomes part of your home’s story, blending practicality with design in the best way possible.